(앞서 구성한 VM에서 진행한다.
외부에서 호출을 위해 리눅스의 이더넷 어댑터 2개 모두 오픈한다.ip는 터미널-> ifconfig -a 결과로 확인)
소프트웨어 별 docker 이미지는 docker hub에서 가져올 수 있다.
이 글에서는 nginx 컨테이너를 통해 간단한 WEB 구성을 수행해 본다.
1. 그냥 만들기 : Nginx docker Image 를 가져와 그냥 띄워보기
- 다음 명령어를 수행하여, nginx docker 이미지를 가져온다.
docker pull nginx- 명령어 수행시 아래와 같이 다운로드가 진행된다.
[root@localhost sorc]# docker pull nginx

Using default tag: latest
Trying to pull repository docker.io/library/nginx ...
latest: Pulling from docker.io/library/nginx
3f9582a2cbe7: Pull complete
9a8c6f286718: Pull complete
e81b85700bc2: Pull complete
73ae4d451120: Pull complete
6058e3569a68: Pull complete
3a1b8f201356: Pull complete
Digest: sha256:aa0afebbb3cfa473099a62c4b32e9b3fb73ed23f2a75a65ce1d4b4f55a5c2ef2
Status: Downloaded newer image for docker.io/nginx:latest
- 참고 링크는 다음과 같다.https://hub.docker.com/_/nginx
nginx - Official Image | Docker Hub
Quick reference Supported tags and respective Dockerfile links 1.23.3, mainline, 1, 1.23, latest 1.23.3-perl, mainline-perl, 1-perl, 1.23-perl, perl 1.23.3-alpine, mainline-alpine, 1-alpine, 1.23-alpine, alpine 1.23.3-alpine-perl, mainline-alpine-perl, 1-a
hub.docker.com
아래 명령어를 통해 별도의 이미지 빌드 없이 바로 기동 가능하다.
1) 8088 포트로 접근시 80포트로 연동
2) -d 옵션 사용하여 백그라운드로 기동(아닌 경우, tail 형태로 걸려서 Ctrl+C 하는 순간 중지됨.)
docker run -d -p 8088:80 docker.io/nginx
테스트는 아래와 같이 가능하다.
curl http://localhost:8088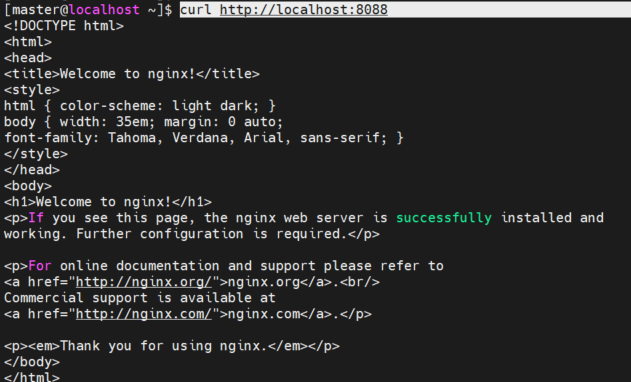

2. 설정 추가해 만들기 : testing 용 nginx 만들어서 기동
- 받아온 이미지 파일을 기반으로 하여, 추가 설정이 된 이미지를 build 한다.
- 먼저 Dockerfile을 생성할 디렉토리를 만든다.
sudo mkdir -p /sorc/nginx/
chown -R master:master /sorc/nginx
- 해당 디렉토리로 이동하여, vi 통해 Dockerfile을 생성한다. 이번에 구성할 Nginx 는 단순 proxy 용이 아니라, Test page 호출 용도도 포함되므로, URL 호출 테스트용 html 파일을 추가한다.
이름은 index.html 로 생성한다.
cd /sorc/nginx/
vi index.html
--아래 내용 붙여 넣기 후 :wq!
<!DOCTYPE html>
<html>
<head>
	<title>Testing Page</title>
</head>
<body>
	<h1 style="font-size: 32px;">Testing Page</h1>
	<p>
		Welcome to the testing page. Below are two buttons that will perform various tests on the system. Please click on one of the buttons to continue.
	</p>
	<form>
		<button type="button" onclick="confirmHttpTest()">Massive HTTP requests</button>
		<button type="button" onclick="confirmMemoryTest()">Out Of Memory Test</button>
	</form>

	<script>
		function confirmHttpTest() {
			var result = confirm("Are you sure you want to perform a Massive HTTP request test?");
			if (result) {
				sendHttpRequests();
			} else {
				alert("HTTP request test cancelled.");
			}
		}

		function confirmMemoryTest() {
			var result = confirm("Are you sure you want to perform an Out Of Memory test?");
			if (result) {
				alert("Out Of Memory test initiated.");
			} else {
				alert("Out Of Memory test cancelled.");
			}
		}

		function sendHttpRequests() {
			var url = "http://example.com/api"; // Replace with your URL
			var numRequests = 10; // Replace with the number of requests you want to send
			var completedRequests = 0;

			for (var i = 0; i < numRequests; i++) {
				var xhr = new XMLHttpRequest();
				xhr.open("GET", url, true);
				xhr.onreadystatechange = function() {
					if (xhr.readyState == 4 && xhr.status == 200) {
						completedRequests++;
						if (completedRequests == numRequests) {
							alert("HTTP request test completed.");
						}
					}
				};
				xhr.send();
			}
		}
	</script>
</body>
</html>
이제 Dockerfile을 만든다. Dockerfile에는 다음과 같은 내용이 포함된다.
- 최신의 nginx 이미지 베이스
- Working 디렉토리 : /usr/share/nginx/html (소스 doc root 위치)
- 로컬의 index.html 파일을 doc root 로 copy 함.
- 8080 포트 외부 오픈
- container 기동시 nginx 기동되도록 함.
# Use an official Nginx runtime as a parent image
FROM nginx:latest

# Set the working directory to the Nginx document root
WORKDIR /usr/share/nginx/html

# Copy the local HTML file to the container
COPY index.html .

# Expose port 8080 to the outside world
EXPOSE 8080

# Start Nginx when the container starts
CMD ["nginx", "-g", "daemon off;"]
Dockerfile 을 생성했다면, 이미지를 build 한다.
- build는 다음과 같은 명령어 수행을 통해 이루어 진다. -t 옵션은 tagging을 설정하며, 미설정시 latest로 설정된다.
- Dockerfile의 위치로 이동해 수행하도록 한다.
cd /sorc/nginx/
sudo docker build -t nginx:nginx-testing .
이제 빌드된 image는 docker images 에서 확인 가능하다.

1번에서 기동한 바와 같이 동일하게 기동 가능하다. 이번에는 --name 옵션으로 testing-web 으로 이름도 지정해 준다.
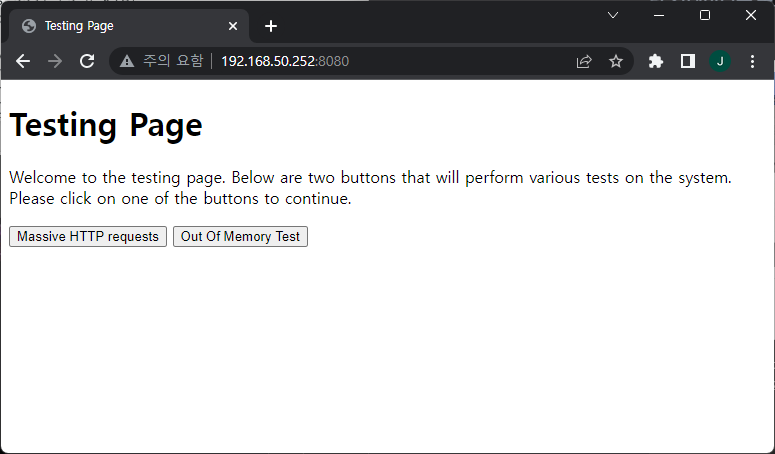
docker run -d -p 8080:80 --name testing-web nginx:nginx-testing테스트는 아래와 같이 가능하다.
curl http://localhost:8080결과는 위에서 설정한 html 페이지가 잘 나온다.

여기까지 nginx 기동에 대한 테스트를 완료하였다.
참고. 기동된 docker 컨테이너는 설정한 docker 네임으로 docker stop <name>
혹은 docker ps 로 확인되는 <container-ID>로 docker stop <container-ID> 기동 중지 가능하다.
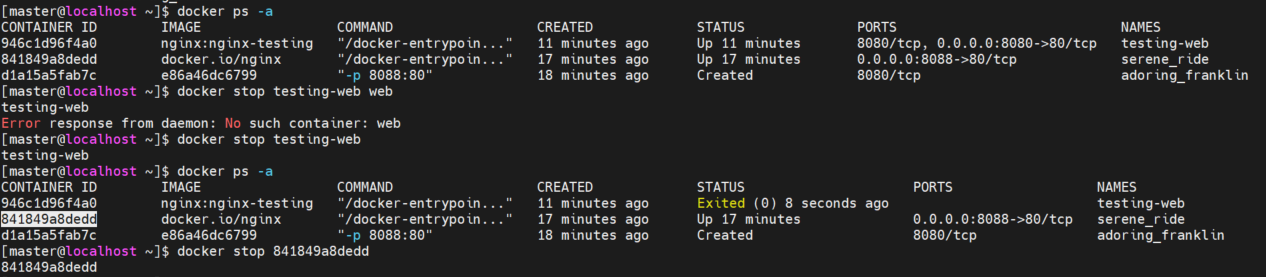
참고2. 중지된 컨테이너가 남아있는 한 동일 이미지로 컨테이너 재 생성은 불가하므로 기동 중지 후에 docker container prune 등의 명령어를 수행하여 잔여 중지 내역을 삭제한다.
(*삭제시 다른 중지된 컨테이너가 없는지 확인 필수, 기동되어 있지 않은 container 모두 삭제됨.)

'IT > Kubernetes_k8s' 카테고리의 다른 글
| Nginx Ingress Controller의 개념 (0) | 2024.08.14 |
|---|---|
| Ingress NGINX에서 간헐적인 502 오류 해결하기 (0) | 2024.08.02 |
| Kubernetes의 kubelet 소개 및 주요 설정 키 (0) | 2024.07.31 |
| Kubernetes Ingress 컨트롤러 502 에러 대응안 (2) | 2024.07.24 |
| k9s: Kubernetes CLI 대시보드 설정 및 사용법 (5) | 2024.07.23 |